Sitecore 9 introduces the new xConnect server to the ecosystem. xConnect is an abstracted service layer that Sitecore uses for all its analytics and marketing automation features. If you’re using Sitecore XP (aka xDB), you’ll need an xConnect server if you upgrade to Sitecore 9.
xConnect is noteworthy because it introduces client certificate authentication for the Sitecore XP server to communicate with xConnect. Certificates are a complex subject, and can fail in any number of less than helpful ways. This post aims to help you understand how certificates work in Sitecore 9, and provide you some tools to diagnose what’s wrong when they are not working right.
What is TLS?
In order to understand how xConnect works, it’s important to understand what’s going on: Transport Layer Security (TLS). You may also think of this as “SSL” or “HTTPS.”
TLS is a protocol for establishing secure encrypted connections between a server and a client. The key aspect of TLS is that the client and server can securely exchange encryption keys in such a way that they cannot be observed by malicious parties that may be watching the exchange.
Asymmetric vs Symmetric Encryption
To understand how TLS works, it’s important to understand the distinction between Asymmetric (also called Public Key) Encryption, and Symmetric Encryption.
If you ever made secret codes as a kid, you’ve probably used symmetric encryption. This is where the sender and receiver both need to know a key to decrypt the message, for example a simple shift cipher where D = A, E = B, and so forth. Julius Caesar famously sent secret messages by shifting letters three places forward like this. Symmetric encryption does have one major downfall, however: posession of the secret key lets you read any encrypted message even if not the intended recipient.
Asymmetric encryption on the other hand uses two different keys: a public key and a private key. The public key can be shared with anyone without compromising anything. However a client can use the public key to encrypt a message in such a way that it can only be decrypted with the server’s private key. In this way, you can receive private encrypted messages from clients you don’t share any secrets with - but they can still send the server private messages.
TLS uses asymmetric encryption to transfer an encryption key for symmetric encryption, which is used for ongoing data transfer over the encrypted connection. This is done because asymmetric encryption is much much slower than symmetric.
It’s important to understand the difference between public and private keys when you set up Sitecore 9, because they need to be deployed to different servers in your infrastructure. A certificate generally includes both a public and private key, however it can also include only a public key.
xConnect Setup
xConnect uses mutual authentication to secure the connections between it and the Sitecore XP server. This is accomplished using TLS client certificates.
If you’ve worked with SSL certificates before, this is a stronger form of SSL where not only does the client have to trust the server, but the server also has to trust a second certificate issued to the client. In this case, the client is the Sitecore XP server, and the server is the xConnect server. Let’s take a look at how this works:
SSL Server Certificate Negotiation
All SSL connections go through this process, whether xConnect or otherwise. In a standard Sitecore 9 XP installation, the xConnect server will have the server certificate installed. The Sitecore XP server will only have a server certificate if access to Sitecore itself, e.g. for administration, is done via SSL (in which case it will likely be a separate server certificate from xConnect’s).
- Client prepares to make a HTTPS request (e.g. you ask for
https://xconnect) - Client sends a ClientHello message to the server. This proposes encryption standards, among other things.
- The server replies with a ServerHello message back to the client. This includes the server’s public key, and the encryption standards that the server has selected from what the client proposed in the ClientHello.
- The client validates the server certificate (e.g. must have correct domain and trusted issuer)
- A symmetric encryption key is generated and exchanged using the server’s public key
- Now that an encrypted connection is established, a normal HTTP request is sent over the encrypted channel
What can go wrong with server certificate negotiation
The most common issues are domain mismatches and untrusted certificates. Generally you can diagnose issues with server certificates using a web browser - request the site over HTTPS and review the error shown in the browser. Make sure you request the xConnect server URL, not the Sitecore XP URL if you are diagnosing an xConnect connectivity issue.
Domain Mismatches
A domain mismatch occurs when a certificate’s domain does not match the domain being requested. For example, a certificate issued to sitecore.net will fail this validation if the site you’re requesting is https://foo.local. Certificates may also be issued using wildcards (e.g. *.sitecore.net). Note that wildcards apply to one level of subdomains only - so in the previous example sitecore.net or foo.sitecore.net would be valid, but bar.foo.sitecore.net would not be.
Domain matching is done based on the host header the server receives. For example if the xConnect server is https://xconnect but can also be accessed via https://127.0.0.1, the certificate will be invalid if the IP address is used because the certificate was not issued for 127.0.0.1.
If you have a domain mismatch issue, you will need to either get a new certificate (and update the xConnect IIS site(s) to use the new certificate) or change the domain for xConnect to one that is valid for the certificate.
Untrusted Certificates
To understand trust issues, it’s important to understand how certificates are issued. Certificates are issued by other certificates.

In fact, certificates can be issued in chains (Xzibit would definitely approve). Trust issues occur when the certificate that issued the server certificate is not considered to be trusted by the client. On Windows, trust is established by being included in the Trusted Root Certification Authorities in the machine certificates:
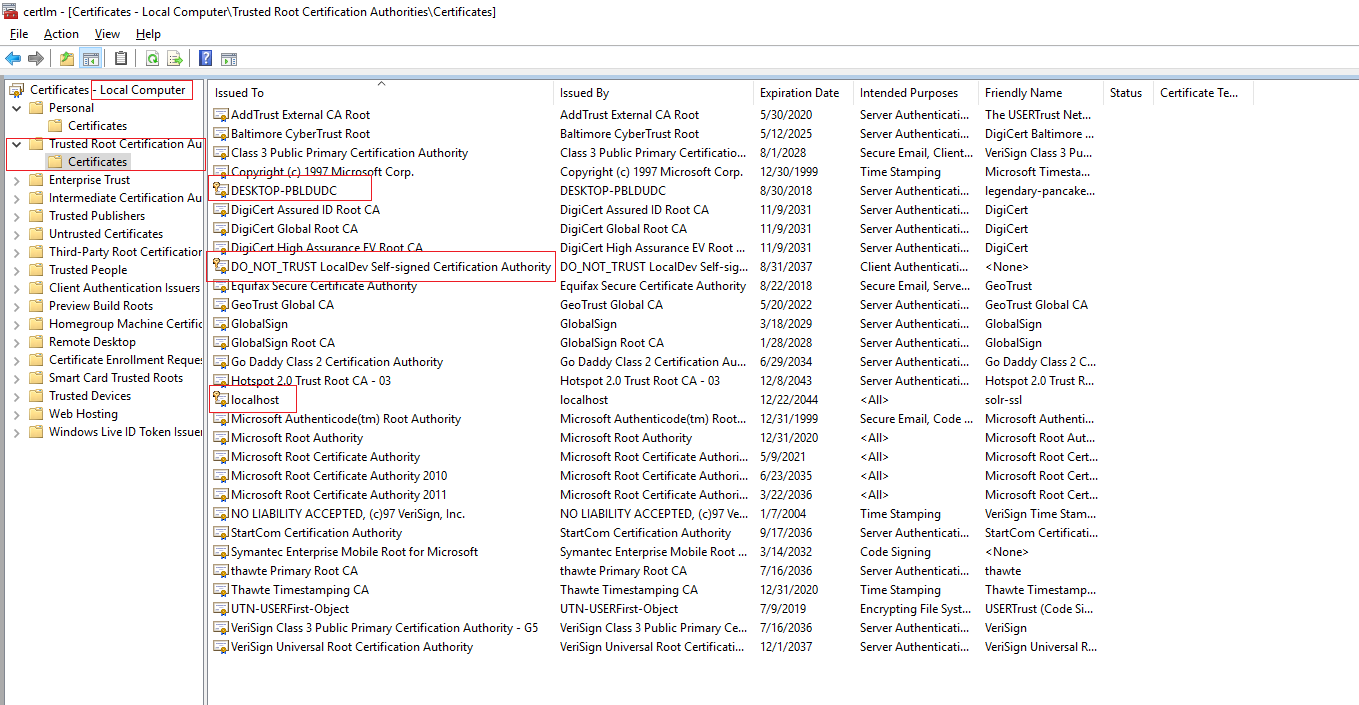
Note that to trust a certificate, only the public key for the server certificate must be imported here. If you’re using self-signed certificates that issued themselves - like localhost in the screenshot - you can add the certificate itself to the trusted root certificates by exporting it and reimporting it into the root certificates. If using a commercially issued certificate, that certification authority’s root certificates must be added to the trusted root - in most cases, they are already present.
More esoteric errors
There are some less common issues that can also cause server certificate negotiation errors. Servers will be commonly secured against supporting vulnerable ciphers, hash algorithms or SSL protocol versions. You might have heard of Heartbleed or POODLE vulnerabilities, or had to support TLS 1.2 if working with some web APIs such as SalesForce. This is a good idea, but if the server and client cannot mutually agree on a supported cipher, hash, and protocol version the connection will fail. If the certificate is trusted and has the correct domain, this would be the next thing to check.
If you’ve never heard of this before, you can secure your IIS servers using a tool like IISCrypto. Go do it now, this post will wait.
Note that the .NET HTTP client with framework versions prior to 4.6.2 defaults to only supporting TLS up to 1.1. Many modern security scripts will disable all TLS protocol versions except for 1.2, which will cause HTTP requests from clients with earlier versions of the .NET framework installed to fail.
SSL Client Certificate Negotiation
Hopefully now you have a decent idea of how server certificates work. But xConnect also uses client certificates. A client certificate enables mutual authentication. With only a server certificate, the client must decide to trust the server but the server has no way to know if it should trust the client. Enter client certificates.
A client certificate is essentially the opposite of the server certificate. When using a client certificate, the negotiation works similarly to the server certificate, except that when the server sends the ServerHello (#3 above) it requests a client certificate in addition to sending its public key. The client then sends the public key of its client certificate back to the server - and then the server decides whether it should trust the client certificate.
If the client certificate is not trusted, it is rejected. The rules for validating a client certificate are up to the server and do not necessarily follow the same validation rules as a server certificate on the client. In the case of xConnect:
- The domain/subject on the client certificate does not seem to matter to xConnect
- The trusting of the certificate is done using the thumbprint of the certificate (a hash of the certficate which uniquely identifies it). Note that the thumbprint will change when an expired certificate is renewed, so you will need to reconfigure xConnect after renewing a client certificate so that it trusts the newer thumbprint.
- The xConnect server must trust the issuer of the client certificate
What can go wrong with client certificate negotiation
There are a lot of things that can go wrong with the client certificate, moreso than the server certificate. When troubleshooting, make your first step the Sitecore XP logs - they generally have some basic information about a bad client cert.
If you’re receiving HTTP 4xx responses
Chances are your client certificate validation failed. This could mean:
- The client certificate is not installed on both the Sitecore XP server and the xConnect server (the xConnect server would only need the public key)
- The client certificate is not considered trusted on the xConnect server
- The certificate thumbprint configured in the xConnect server’s
App_Config\ConnectionStrings.configis missing or incorrect. Note that the thumbprint must be all uppercase with no spaces or colons. If copied from certificate manager, an unprintable character might prefix the thumbprint - check for a hidden character there. - The certificate location configured in the xConnect server’s
App_Config\ConnectionStrings.configis incorrect. Normally the certificate should be stored in local machine certificates and have a connection string similar toStoreName=My;StoreLocation=LocalMachine;FindType=FindByThumbprint;FindValue=THUMBPRINTVALUE.
“The certificate was not found”
This indicates one of two things:
- The thumbprint is incorrect in the Sitecore XP server’s
App_Config\ConnectionStrings.configfile. Note that the thumbprint must be all uppercase with no spaces or colons. If copied from certificate manager, an unprintable character might prefix the thumbprint - check for a hidden character there. - The certificate location configured in the Sitecore XP server’s
App_Config\ConnectionStrings.configis incorrect. Normally the certificate should be stored in local machine certificates and have a connection string similar toStoreName=My;StoreLocation=LocalMachine;FindType=FindByThumbprint;FindValue=THUMBPRINTVALUE.
System.Net.WebException: The request was aborted: Could not create SSL/TLS secure channel.
As long as the server certificate is valid, this message is most likely that the Sitecore XP server’s IIS app pool user account does not have read access to the client certificate’s private key. This access is needed so that the Sitecore XP server can encrypt communications using its client certificate.
To remedy this issue, open the local machine certificates (“Manage computer certificates” in a start menu search) on the Sitecore XP server. Find the client certificate (normally under Personal\Certificates). Right click it, choose All Tasks, then Manage Private Keys.... You should get a security assignment window like this:
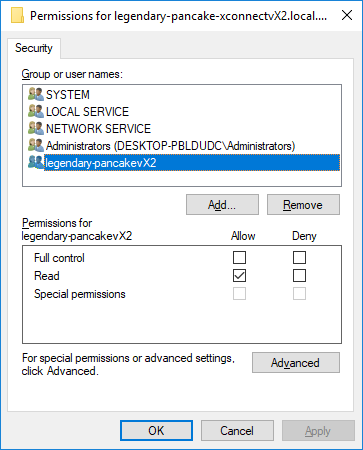
Next, add your IIS app pool user to the ACLs and grant it Read permissions (as above). Remember if you’re using AppPoolIdentity (you should be, unless using a domain account for windows auth to SQL), you must select the account by choosing Local Computer as the search location, and enter IIS APPPOOL\MyAppPoolsName as the account name to find.
Still having issues? Well, you can also use the security audit log to find out which account is failing to get access, then add that account in the key ACLs above:
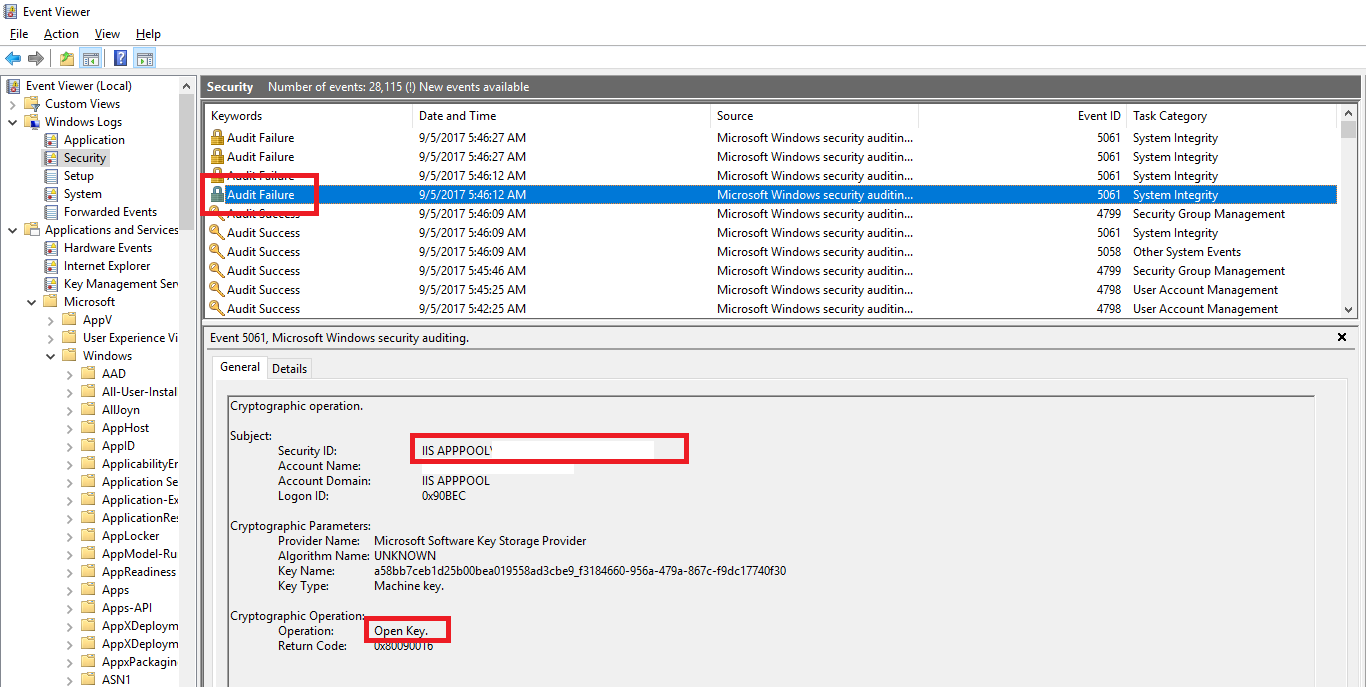
Local Development Tip
If you work at a Sitecore partner and will have multiple copies of Sitecore 9 running locally, this can cause issues if you issue a dedicated SSL server certificate to each site. This is because a given TCP port (e.g. 443, the default) can only have one SSL certificate bound to it. This precludes having multiple Sitecore 9 instances running together locally unless they share the same SSL certificate.
Wildcard certificates are perfect for this job. As long as you use the same top level suffix for all your dev sites (e.g. *.local.dev), you can use the same wildcard certificate for your server certificate for all dev sites. Note that IIS’ self-signed certificate generator will not create a wildcard certificate for you. You’ll have to use something else, like New-SelfSignedCertificate, to create one.
Important note: You must issue a wildcard for at least two segments of domain for it to be trusted. For example *.dev is bad, but *.local.dev is good.
Note that client certificates should be unique on each site, only the server certificate should be shared.
In the release version of Sitecore 9, you can also disable the requirement to use encryption with xConnect which can bypass a lot of debugging. Do not do this in production or else a herd of elephants will destroy you.
Advanced Debugging with Wireshark
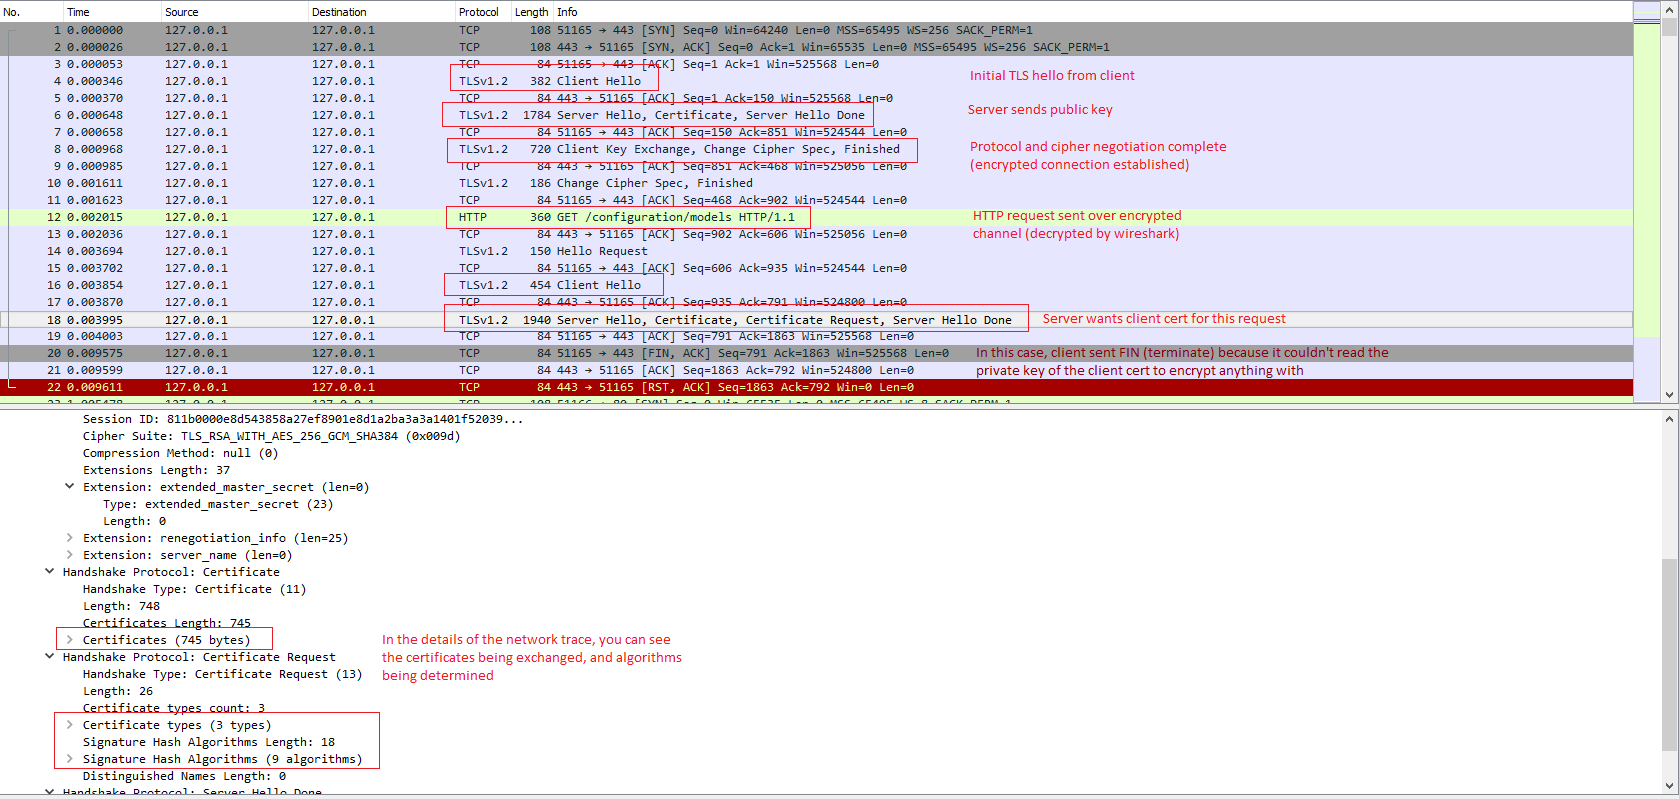
It’s possible to watch the SSL negotiation at a TCP/IP level using a network monitor such as Wireshark. This can provide insights on why your setup is failing when error messages are less than optimal. For example I spent a couple days diagnosing what turned out to be private key security issues. I figured this out by using Wireshark and observing that the client was never sending its client certificate after the server requested it, and figuring out why that was.
To use Wireshark to watch SSL traffic, you’ll have to set it up to decrypt traffic. This guide walks you through setting up decryption on Windows with an exported private key.
If you’re tracing local dev traffic (e.g. from localhost to localhost, including using your machine’s DNS name) Wireshark will not capture that unless you install npcap instead of the default pcap packet capture software. Once npcap is installed, tell Wireshark to bind to the Npcap Loopback Adapter to see local traffic.
Here is a screenshot of the Wireshark capture where I diagnosed the client certificate security issue:
